|
|
|

The third disk opens with Squall lying in the Dormitory thinking of all the occurred events. Head for the Infirmary and check the unconscious Rinoa. Now Quistis informs Squall that Edea is back in her house in the Centra continent. Now head up the the pilot control room and you will have to reform a new party, but Rinoa is unplayable. Now head to the Lighthouse building near the forest that G-Garden previously was in disk 2. Once inside talk to people waiting, then talk to Cid (a Timber maniac mag is here). Go to the room on the right and talk to Edea. There will be a sequence of her talking about the past and Sorceress Ultimecia. Meanwhile Squall will be thinking of Rinoa. Now head back to Balamb Garden and head to the Iinfirmary where you check on Rinoa. Laguna time...
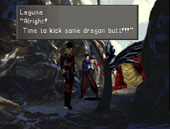
Laguna, Kiros and Ward is stuck in Trabia Canyon and Laguna is acting a role as a knight in a movie to earn some money. Nowthe screen switches to a Laguna with a movie director and a actress. Now the scene is of Laguna a dragonlayer but Kiros and Ward is missing and a real dragon shows up! You will now take part in a mini-game similar to the one in Squall's time.
Dragon slaying!
Square: Defend
X: Attack
When you defeated the dragon, Laguna runs away but is trapped! Thankfully, Ward and Kiros comes to the rescue. Now pick the 2nd option because no GFs is junctioned to neither Kiros or Ward. Now after equiped, run into the dragon.
 |
HP: 21,700 Lv 32 Weak against Ice/Holy, Thunder and Wind has no effect Draw: Fira, Aero Mug: 1x Inferno Fang Win: 2x Red Fang, 14 AP |
 |
Now head to Edea's house and talk to her again. She will tell you the whereabouts of the white SeeD ship, Ellone may be on it. Now pilot the Garden to a C shaped cove near the Centra Ruins (World Map). Make contact with the ship there to board it. After chatting with the stern captain, go up and you will meet two familiar faces: Watts and Zone! Zone gets pissed at Squall and run, while Watts is more calm. Now talk to Zone 3 times and he will ask you for the 'Girl Next Door' magazine (If you got it from Timber). Give it to him for free enables you to recieve a Shiva card and a Rename card. Now take the Timber Maniac mag and head back up. Go to |
| Head east from the station and you will arrive in a vast white/grey/bones area. This is the Great Salt Lake. First, climb up the skeleton of the dinosaur thing and draw from the hidden Draw Point (Meteor). Head north across the bone and there will be another Draw Point (Thundaga). Head back down to the entrance and go north. Keep going north until there is a steep cliff. Go right and save at the Save Point. Now go left and there will be a boss fight! | 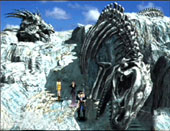 |
Watch out for its ghostly physical attacks that causes poison! When it stands 8 ft tall, it will cast all sorts of abnormal status. You can kill it easily though. Use a Phoenix Down on it and it will die. Draw Curaga from it and cast it on itself and it will fall quickly. After the killing the undead beast, go up and examine the area where there is a force field. A hole will suddenly appear and a invisible ladder. Climb up the ladder (How can Squall climb up the ladder with Rinoa on his back?) and keep proceeding until you are in a moving elevator.
FMV
The city of Esthar is revealed and it completely
covers the Salt Lake.
Now when you reach the building, everyone suddenly collapses and its Laguna's last flashback!
Laguna is in trouble! He is working as a prisoner in the Esthar Lunatic Pandora Research Center. After several conversations with fellow prisoners. Suddenly, an Esthar soldire gets angry and you will have to fight 2 Esthar soldiers and a Gesper. Equip GFs before you fight, by the way. Now enter the elevator.
FMV
The high-tech elevator comes down to the bottom
floor.
| Now sneak past Dr.Odine and his assistants. There will be a series of conversations and eventually you will have to head back into the lab. Save your game and go back to the 2nd floor of the lab. You will not only find Dr.Odine but some Esthar soldiers too. Kill the 2 soldiers ans the Elastoid. Now follow Odine. You will find yourselves in Odine's personal lab. Go on the hovering thing and kill the Esthar robots. Now examine the control panel until it respond. Go back down and enter through the door in the top middle. You will find Ellone... | 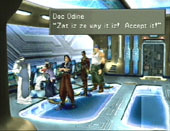 |
Now back to Squall, a man will arrive and escorts your party to the Presidental Residence of the city. Here, Dr. Odine appears and insists on studying Rinoa, while Edea asks him for advice. After the conversation, the man will ask you to head to Lunar Gate. Now head out and go right, and go on the hovering thing, which will take you out of the palace.
FMV
The hovering thing activates a shield, and smoothly
slides out of the structure.
Now you can explore this huge city! Other then the busy streets and pipes, here are some places to visit:
1. Left side of city: Save point
2. Far left of city: Airstation
2. Left bottom of city: Dr. Odine's laboratory
3. Centre of city: Presidental Residence
4. Right side of city: Shopping Mall
5. Centre bottom of city: Entrance and Rent-a-Car
Don't forget to go to the Shopping Mall, and play some cards. Now once you are finished with exploring, exit the city. You can rent a car (so you can avoid the Malboros), or just walk to Lunar Gate.
FMV
The elevator Squall is in activates a shield
and slides through a tube.
Now before you head to Lunar Gate, get to Tear's Point first to obtain Solomon's Ring. It is the dark object on the ground near the statue. It helps summon GF Doomtrain, with 6x Malboro Tentacles, 6x Steel Pipes, 6x Remedy+. Now head to Lunar Gate. Once inside the complex, Angelo will rush in. Now go in the Deep Freeze room. Squall must go into outer space to find Ellone, along with Rinoa and another party member (Exception of Zell and Edea). After Squall enters the rocket, the screen switches to the launch control room. The engineers confirmed it is ready for blastoff.
FMV
The rocket loads the final capsule and it is
launched into space towards the moon.
Now controlling Zell, head for the entrance of the Lunar Gate, and suddenly everything shakes! Head outside and you will see the legendary Lunatic Pandora.
FMV
Lunatic Pandora floats out of the sea and it
seems to be heading for Esthar.
Now reform a a new party with Zell, Edea and another party member. Now head back to Esthar City. You will see there are injured Esthar soldiers and random encounters with Galbadians. Head for Dr.Odine's lab. Now go to the second floor and talk to him. There will be a sequence, and then he will show you a plan to board Lunatic Pandora. There are 3 board points. Press square to view a thumbnail of the place. Once you have boarded, you have to fight some Galbadians. Get them out of the way. Now no matter which board point you have boarded, you will eventually get thrown off the Pandora by some giant robot (Mobile Type 8!). Now you will see Lunatic Pandora drift away...
FMV
The Lunatic Pandora floats just above Tears Point,
and the crystals react very strangely...
Now in outer space, the rocket where Squall is in heads for some Space Station.
FMV
The process of connecting shuttles and rockets
begins, and some astronaut workers help carry elements of the Lunar Base.
There will be a sequence of a man in a spacesuit.Now you will be in a upside-down area. Talk to the technician, then examine Rinoa at the bottom. Now you will be directed to the base's medical lab. After Rinoa is in a secure place, follow Piet, the head technician (he has the Alexander card). At the control room, look at the monitor the other party member is looking at.
FMV
The telescope maganifies and monsters on the
moon are gathering in one place.
Now head upstairs and go in the door in the far end. Talk to Ellone (She has the Laguna card). After a brief conversation, you will follow you to get to the Medical lab. Now head to the lab, but suddenly a, there is a RED ALERT in the base! Something is wrong in the Med. Lab! Quickly head to the lab and you will find unconscious workers. Rinoa is acting very ghostly! Touch her and you will repel off her. Now follow her to the control room, and you will see her deactivate Shield 1 of the Adel tomb. Now quickly follow her again to the astronaut lockers. You see her get into outer space, so quickly put on a space suit! Now go through the hatch and keep floating down. You will hear a conversation of the 3 workers. Keep heading down until the giant door until it closes! Now head back up and go to back to the control room. Look in the telescope monitor again...
 |
Talk to everyone, then look at Adel's Tomb... |
Now everyone heads to the escape pods. Follow them and go into the empty escape pod.
FMV
The escape pods escape just in time, while Lunar
Base explodes on impact of the lava.
Now Ellone will send Squall to see the past of Rinoa. There will be two sequences, Rinoa with Irvine, and Rinoa with Zell. Now Squall tells Ellone that the flashbacks are too far back. Ellone will send Squall into another flashback, but this time is when Rinoa is overtaken by Ultimecia in G-Garden, who tells Seifer to retrieve Lunatic Pandora. Now Squall gets out and Ellone sends Squall into the closest present...
FMV
Rinoa is floating through space, and her life
support system is finished. Then she sees Squall's chain, and she
activates another oxygen tank.
Now Squall is determined to save Rinoa. He exits the escape pod, and now there will be a mini-game:
Finding Rinoa
Directional Buttons - Move
Triangle - Use rocket boost
Your objective is to keep Rinoa in the center
of the screen and speed up to her in 2 minutes.
|
Squall reaches out and hugs Rinoa. |
 |
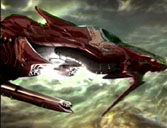
FMV
Squall and Rinoa heads for a floating space ship.
It has the words ESTHAR: RAGNAROK on it. Now Squall and Rinoa opens
a hatch and heads inside.
Now Squall and Rinoa will float around. Save your game and head to the next room. Another brief conversation, then head to the next room. Suddenly an alien will appear (Yikes!). The alien then walks away, but you will have to fight 8 of them in a specific order!
Propagator
Lv 42 HP: 5200
Draw: Thundaga, Curauga, Esuna, Life
Mug: 6-12x Wizard Stone
Win: 2-4x (Any kind of stone)
These are the Propagators on board:
2x Purple
2x Yellow
2x Red
2x Green
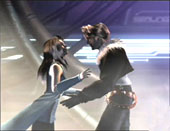
To defeat this quite easy ETs, you will have to kill two Propagators of the same colour in a row. eg. Kill 1 purple, then the other purple , then kill 1 yellow, and then the other yellow, and so on. If you kill 1 of a colour, let say yellow, then you kill a red one before killiing the second yellow one, the first yellow one will be revived! So sometimes you will have to avoid a certain Propagator before you kill it (especially the purple one in the hall!). After killing all of the aliens, enter the elevator and Squall and Rinoa will be in the cockpit. Now there will be a romantic sequence of Squall and Rinoa with Faye Wong performing 'Eye's on Me' for the music. Now after the lovely sequence the Ragnarok will land in the desert and Rinoa will be taken away by the Esthar officials to seal Rinoa's powers. Now head back to the passenger room in the airship and then the rest of the members will appear. After a brief conversation Squall decides to rescue Rinoa. Suddenly Selphie will be piloting the Ragnarok spaceship! You can now pilot the Ragnarok to everywhere in the world!
Now pilot the Ragnarok to the Esthar Sorceress Memorial (The structure across the blue lake from Esthar City). Head inside and the Sentries will let you in. Now your other party members will defend you while Squall will head off to rescue Rinoa from the Power cell. Squall cuts a pipe with his gunblade.
 |
Squall holds his gunblade as the gas streams out. Rinoa come out through the gas and hugs Rinoa. Head back to the entrance and the scientists are quite upset. Your party members are preparing to battle the Esthar soldiers, when suddenly a mysterious Esthar official appears to open a path for Squall and co. to escape with Rinoa. Now head back to the Ragnarok and Rinoa is now back in your party. |
Now you can freely complete the side-quests hidden in the game. First you can try out the Queens of Cards quest. But get the remaining GFs first.
Doomtrain
Mug 6x Steel Pipes from Wendigos or refine from
Elastoid card.
Mug 6x Malboro Tentacles from the Malboros in
Grandidi Forest, Island closest to Heaven and Island closest to Hell (Battle
guide here),
or refine from Malboro cards.
Buy, win or refine 60 Remedies and use Alexander's
Med
Lv Up ability to receive 6x Remedy+.
And finally if you haven't already got it, get
Solomon's Ring in Tears Point. Once you have all these items in your
inventory, use the Solomon's Ring to recieve the GF Doomtrain!
|
|
 |
For a special tips and strategy on defeating this boss, click here. After defeating this boss, you will recieve the GF Cactuar!
|
|
 |
This boss is fairly tough unless you have acquired Squall's ultimate weapon, the Lion Heart. Cast Meltdown on him and use as much limits as you can, plus powerful magic. Demi and Diablos does not work on it unlike the regular Tonberries. Squall can finish it off with one hit with his Lion Heart Limit. After the battle, Tonberry King turns back into a regular Tonberry and joins your party!
 |
(Uh... my fav GF ^_^) |
Special Boss: Bahamut
Lv 80 HP: 74,000
Strong against Poison, Thunder/Wind has no effect
Draw: Flare, Curaga, Full-Life, Dispel
Mug: 1x Power Wrist
Win: 1x Power Wrist,1x Bahamut Card, 40 AP
Bahamut is not that tough, but he IS the King of GF, isn't he? Click here for a special guide to defeating him. After the battle, head back to the Ragnarok and talk to everyone, then land back down on the Research Center to obtain GF Eden.
Eden
I suggest to have high levels before venturing
down to the depths of the center. Zell is a compulsary character in this
section. Climb down the hole and examine to machine to the left.
It will activate the hatch. Climb down and on each level there will
be a block machine to the right. You will have to have 10 gas blocks
when your reach the Deep Sea Deposit. Here is the order of the imput
of the gas blocks 4 floors:
Floor 1: 2
Floor 2: 2
Floor 3: 1
Floor 4: 1
| Now when you reach the large machine, have Zell operate it the machine and the door to the Deep Sea Deposit will activate. Head inside and SAVE! Now the tricky part: There will be heaps of monster battles here as you venture down and you can't help it. Depending on your situation, every 2 steps you will meet a monster with no escape. With Enc-Half ability, every 4 steps and with Enc-None, every 8 steps. Here are the monsters you will meet: |  |
Special Boss: Ultima Weapon
Lv 100 HP: 160,000
Draw: Regen, Dispel, Ultima, Eden
Mug: 1x Three Stars
Win: 100x Ultima Stone, 1x Eden Card, 100 AP
Draw Eden from Ultima Weapon NOW!! Click HERE for the ultimate guide to defeating Ultima Weapon.
| Now its time to get back to the story! Now head to Edea's House and follow Angelo (The dog). Squall and Rinoa will have a deep conversation, but Zell will break the magic! He says the Esthar president wants to hire SeeDs to defeat Sorcoress Ultimecia. Head for Esthar and enter the Presidental Palace. Enter the room with the guards and you will see three familiar faces- Laguna, Kiros and Ward! Laguna is the president and Kiros and Ward are high officials. Dr.Odine will enter the room and they explain a mission to defeat the ultimate mastermind, Ultimecia, and rescuing Ellone. |  |
That FMV pops up somewhere in the options. After the mission briefing, Laguna and the others will accompany Squall and co. Now pilot the Ragnarok straight into Lunatic Pandora floating above Tear's Point.
 |
The Ragnarok destroys the shield with its missiles and crashes straight into LP. Then Ragnarok's arms folds out andd climbs deeper. |
|
Lv 44 HP: 18,200 Weak against Poison, absorbs Wind Draw: Aero, Curaga, Full-Life, Tornado Mug: 1x Megelixir |
Lv 44 HP: 22,600 Weak against Poison, absorbs Thunder Draw: Thundara, Thundaga, Shell, Protect Mug: 2x Str Up |
Summon Doomtrain, then keep attacking with GFs and magic. Easy battle! Now proceed and you will meet Wedge and Biggs, but this time they won't even notice you! Proceed and enter the 02 elevator. Now head to the elevator to the left and save your game at the Save Points. Proceed up and you will meet Fujin and Raijin once again, but this time they will summon a robot to fight you, then one that kicked Zell and Edea off the other time!
|
Lv 41 HP: 9100 Earth has no effect Draw: Curaga, Esuna Mug: 2x Vit Up |
Lv 41 HP: 46,400 Weak against Thunder, Earth has no effect Draw: Firaga, Thundaga, Blizzaga, Flare Mug: 2x Laser Cannon |
Lv 41 HP: 9100 Earth has no effect Draw: Firaga, Thundaga, Blizzaga Mug: 2x Str Up |
Quite easy boss. Just summon Quezalcotl, Bahamut, or Eden. Thundaga works well. Watch out for its Ray Bomb attack. Now proceed to the next room. Seifer, Fujin and Raijin are there but they release Ellone. Then they run away and you will now have to face Seifer one last time...
Boss: Seifer
Lv 45 HP: 34,500
Weak against Poison
Draw: Firaga, Thundaga, Blizzaga, Aura
Mug: 1x Holy War
Win: 1x Holy War, 40 AP
Draw Aura spells immediately until everyone has 100 of them stocked. Cast Bio and summon Doomtrain on him. Then use his Auras and take him out, or use GFs. If you have Odin, Odin will die, but Gilgamesh will take his place and later on finishes off Seifer. After the battle , Seifer collapses, but takes Rinoa as hostage, then runs away! Squall, you have to save her!
END OF DISK THREE
Disk
1 / Disk 2 / Disk 4
![]()
